Wednesday, August 16, 2006

CNET's review of PowerPoint 2007 and functionality.


This is a great review by CNET including lots of pictures of the new PowerPoint 2007.

Tuesday, August 15, 2006

FREE PowerPoint 2007 e-course from Microsoft!

Course 4627: What's New in Microsoft® Office PowerPoint® 2007

This online course introduces the new features and functionality in the latest version of Microsoft Office PowerPoint. There have been substantial changes to the user interface in this presentation application, and this course can help you get up-to-speed quickly. This course covers the new features that enable you to create dynamic and engaging presentations using Office PowerPoint, as well as to collaborate with others by sharing your presentation and slide libraries using Microsoft Office SharePoint Server.

Friday, August 11, 2006

Create Your Wedding Monogram in Microsoft PowerPoint

Creating your own wedding monogram is easy with PowerPoint. Here's a quick and simple tutorial demonstrating how. For more information, please see http://www.favorideas.com/monogram/

The Gregory Mantell Show -- Kim Dower: Life is a Series of Presentations

Life is a Series of Presentations. Practically every time you say or do anything, at home or work, you are making a presentation, whether or not you realize it. Kim Dower, media coach for celebrities, gives advice on how to make presentations that get the results you want.

Gregory Mantell has been called one of the best interviewers in America.

The Gregory Mantell Show is a weekly 1/2-hour cable TV talk show that airs in LA and New York. The program focuses on experts, the entertainment industry, and health & fitness.

Tuesday, August 08, 2006

Microsoft PowerPoint 2000 Volume II Training and Help

Working with Wizards and Masters
- Introduction to PowerPoint 2000
- Introduction to Segment 1
- Using the AutoContent Wizard
- Selecting and Deleting Multiple Slides
- Interactive Exercise #1 Result
- Interactive Exercise #1
- Interactive Exercise #1 Result
- Modifying the Slide Master
- Changing the Bullet Design
- Using the Ruler to Change Tabs
- Creating a Custom Background
- Interactive Exercise #2 Result
- Interactive Exercise #2
- Interactive Exercise #2 Result
- Modifying the Title Master
- Interactive Exercise #3 Result
- Interactive Exercise #3
- Interactive Exercise #3 Result
- Saving a Presentation as a Template
- Opening a New Presentation Based on a Template
- Exiting PowerPoint 2000
- Additional Exercise
Advanced Drawing Techniques
- Introduction to Segment 2
- Creating a Blank Presentation
- Displaying Guides and Rulers
- Drawing a Square
- Drawing a Donut
- Grouping Objects
- Applying Drawing Attributes to an Object
- Applying a Textured Background
- Resizing an Object
- Drawing an Arc
- Duplicating an Object
- Drawing a Trapezoid
- Rotating an Object
- Changing the Fill Color of an Object
- Interactive Exercise #4 Result
- Interactive Exercise #4
- Interactive Exercise #4 Result
- Saving the Presentation
- Selecting Multiple Objects
- Scaling an Object
- Adding Text to an Object
- Interactive Exercise #5 Result
- I

Saturday, July 22, 2006

PowerPoint 2007

Holy cow.

This new version of PowerPoint is simply to DIE FOR.

I'm telling you - once you see what it can do you will no longer visit my site or others to create your own masterpiece presentations.

I was lucky enough to be part of the beta group testing it... and this thing kicks ass.

Simply beautiful and intuitive. I loved it. Go play the demo if you get a minute and tell me what impressed YOU most!

Let me know what you think... send me a comment if you have a minute...

:)

Saturday, February 25, 2006

Keyboard Shortcuts for PowerPoint 2003

You can perform the following tasks while running a presentation in slide show view:

Navigating
Stop or restart an automatic slide show by pressing S or PLUS SIGN.
End a slide show by pressing ESC, CTRL+BREAK, or HYPHEN.
Go to slide number by pressing number+ENTER.
Go to the next hidden slide by pressing H.
Return to the first slide by pressing 1+ENTER (or press both mouse buttons for 2 seconds).

Pausing
Display a black screen, or return to the slide show from a black screen by pressing B or PERIOD.
Display a white screen, or return to the slide show from a white screen by pressing W or COMMA.

Rehearsing
Set new timings while rehearsing by pressing T.
Use original timings while rehearsing by pressing O.
Use mouse-click to advance while rehearsing by pressing M.

Annotating
Erase on-screen annotations by pressing E.
Show or hide ink markup by pressing CTRL+M.

Working with the pointer
Show or hide the arrow pointer and Slide show toolbar by pressing A or =.
Hide the pointer and Slide show toolbar immediately by pressing CTRL+H.
Hide the pointer and Slide show toolbar in 15 seconds by pressing CTRL+U.
Redisplay hidden pointer and/or change the pointer to a pen by pressing CTRL+P.
Redisplay hidden pointer and/or change the pointer to an arrow by pressing CTRL+A.

Working with animations
Perform the next animation or advance to the next slide by pressing N, ENTER, PAGE DOWN, RIGHT ARROW, DOWN ARROW, or the SPACEBAR (or click the mouse).
Perform the previous animation or return to the previous slide by pressing P, PAGE UP, LEFT ARROW, UP ARROW, or BACKSPACE.

Working with hyperlinks
Go to the first or next hyperlink on a slide by pressing TAB.
Go to the last or previous hyperlink on a slide by pressing SHIFT+TAB.
Perform the "mouse click" behavior of the selected hyperlink by pressing ENTER while a hyperlink is selected.
Perform the "mouse over" behavior of the selected hyperlink by pressing SHIFT+ENTER while a hyperlink is selected.

Displaying additional tools
View the Windows task bar by pressing CTRL+T.
Display the All Slides dialog box by pressing CTRL+S.
Display the shortcut menu by pressing SHIFT+F10 (or right-click).

See a list of keyboard shortcuts by pressing F1.

Sunday, February 05, 2006

Microsoft Office Training: The small print: headers and footers

Microsoft Office Training: The small print: headers and footers

Watch this course to learn all about headers and footers, page numbers for slides and handouts and how to format everything for different purposes.

Thursday, November 03, 2005

Keep Track of Action Items During a Slide Show


Keep Track of Action Items During a Slide Show


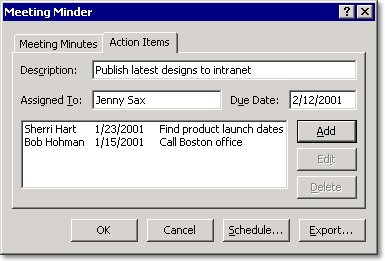
THIS ONLY WORKS IN POWERPOINT 2000 AND BELOW VERSIONS! When giving a presentation, have you ever needed to make a list of ideas, comments, suggestions, or action items? Instead of using a flip chart, use PowerPoint. Here's how:

In Slide Show view, right-click anywhere in the slide, and then, on the shortcut menu, click Meeting Minder.
Click the Action Items tab.
Type your information into the Description, Assigned To, and Due Date boxes, and then click Add.
Repeat step 3 if you want to add more action items, and then click OK.

Your items appear on a new slide at the end of your slide show. You can use this slide as a way to review the ideas or suggestions that came up during the slide show or as a reminder of the action items that need to be addressed.


You can export your action item list to Word or Outlook. Here's how:

On the Tools menu in PowerPoint, click Meeting Minder.
In the Meeting Minder dialog box, click Export.
To create a new Word document that contains your list of ideas or action items, select the Send meeting minutes and action items to Microsoft Word check box.
To place them on your task list in Outlook (and assign each task to the appropriate person later), select the Post action items to Microsoft Outlook check box.
Then, click Export Now.

Tuesday, November 01, 2005

Recording your own sound effects on your PC

If you don't have a WAV file on your PC, don't worry, you can record your own WAV files using your PC's sound recorder. All you need is a microphone and a sound card with a mic input. To record a sound effect, make sure your microphone is hooked up properly and then choose Programs | Accessories | Entertainment | Sound Recorder from the Start menu to open the Sound - Sound Recorder dialog box. Note, if you're using Windows 95, choose Programs | Accessories | Multimedia | Sound Recorder to open the Sound Recorder dialog box. Once you're ready to begin recording, click the Record button and say something into the microphone. Use your imagination and try to create your own unique sound effect. As you're recording, the green line in the center of the Sound - Sound Recorder dialog box should begin moving in a wave format. When you've finished recording, click the Stop button. You can play back your recording by clicking the Play button. If you like the recorded sound, you can save it as a WAV file. To do this, first choose File | Save As to open the Save As dialog box. Next, choose a location for your sound and enter a name for it in the File Name text box. Finally, click Save.