Thursday, November 03, 2005

Keep Track of Action Items During a Slide Show


Keep Track of Action Items During a Slide Show


THIS ONLY WORKS IN POWERPOINT 2000 AND BELOW VERSIONS! When giving a presentation, have you ever needed to make a list of ideas, comments, suggestions, or action items? Instead of using a flip chart, use PowerPoint. Here's how:

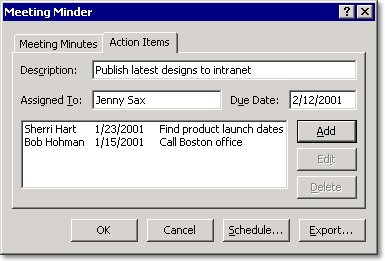
In Slide Show view, right-click anywhere in the slide, and then, on the shortcut menu, click Meeting Minder.
Click the Action Items tab.
Type your information into the Description, Assigned To, and Due Date boxes, and then click Add.
Repeat step 3 if you want to add more action items, and then click OK.

Your items appear on a new slide at the end of your slide show. You can use this slide as a way to review the ideas or suggestions that came up during the slide show or as a reminder of the action items that need to be addressed.


You can export your action item list to Word or Outlook. Here's how:

On the Tools menu in PowerPoint, click Meeting Minder.
In the Meeting Minder dialog box, click Export.
To create a new Word document that contains your list of ideas or action items, select the Send meeting minutes and action items to Microsoft Word check box.
To place them on your task list in Outlook (and assign each task to the appropriate person later), select the Post action items to Microsoft Outlook check box.
Then, click Export Now.

Tuesday, November 01, 2005

Recording your own sound effects on your PC

If you don't have a WAV file on your PC, don't worry, you can record your own WAV files using your PC's sound recorder. All you need is a microphone and a sound card with a mic input. To record a sound effect, make sure your microphone is hooked up properly and then choose Programs | Accessories | Entertainment | Sound Recorder from the Start menu to open the Sound - Sound Recorder dialog box. Note, if you're using Windows 95, choose Programs | Accessories | Multimedia | Sound Recorder to open the Sound Recorder dialog box. Once you're ready to begin recording, click the Record button and say something into the microphone. Use your imagination and try to create your own unique sound effect. As you're recording, the green line in the center of the Sound - Sound Recorder dialog box should begin moving in a wave format. When you've finished recording, click the Stop button. You can play back your recording by clicking the Play button. If you like the recorded sound, you can save it as a WAV file. To do this, first choose File | Save As to open the Save As dialog box. Next, choose a location for your sound and enter a name for it in the File Name text box. Finally, click Save.

Wednesday, October 26, 2005

Learn about playing movies in PowerPoint!

this is an audio post - click to play


Everybody likes movies. In PowerPoint, take your audience away with a dramatic movie clip that helps get your point across. Or play film of a dynamic speaker. Or, play something fun just to engage people. There's nothing like the entertainment value and flash of a multimedia show.

In this course, work with movie files so you know how to insert them, play them, and set other options for them. For visual impact, create buttons that play, pause, and stop a movie.

http://office.microsoft.com/training/training.aspx?AssetID=RC0107383410333

Monday, October 17, 2005

Embedding Fonts

this is an audio post - click to play


If you want to know whether a font you're using can be embedded or not, you can choose an option in the Options dialog box (Tools menu) to always embed fonts. Then, if a font won't embed, you'll get a message about that when you save your file.

1. On the Tools menu, click Options.
2. On the Save tab, select the Embed TrueType fonts check box.

For more about embedding fonts, see PowerPoint Help.

Monday, October 10, 2005

Protect Your PowerPoint Presentations

this is an audio post - click to play


Want to make sure your presentations are safe from changes by other users? With Microsoft PowerPoint 2002, you can help protect your presentations while you are working on them.

On Tools menu, click Options, and then click the Security tab.
Decide on a password, and type it in either the Password to Open or Password to Modify box, depending on whether you want to protect the document from viewing or from modification.
Click OK.

Tuesday, October 04, 2005

Create a Photo Album Presentation in PowerPoint 2002 and Above

Did you know you could use PowerPoint version 2002 and above to create a photo album?

Here's how:

On the Insert menu, point to Picture, and then click New Photo Album.

In the Photo Album dialog box, you can choose to add pictures from your hard disk or a peripheral device, such as a scanner or digital camera. To add a picture from a file or disk, do the following:

Under Insert picture from, click File/Disk.

Locate the folder or disk that contains the picture you want to add to your photo album, click the picture file, and then click Insert.

Repeat Step 2 for as many pictures as you want to add to your photo album. Or to capture them all at once, hold down the CTRL key, click each picture file you need, and then click Insert.

Next, specify the look of the album under Album Layout.

Then click Create.


Note: If you want to change or update your photo album after you have created it, use the Format Photo Album dialog box from the Format menu.

Monday, September 26, 2005

How to Start Slide Numbers at Zero

On the File menu, click Page Setup.

In the Page Setup dialog box, in the Number slides from box, change the number from 1 to 0, and then click OK.

Your second slide will now be numbered 1. (Doing this could be a good idea if you've chosen not to show numbers on the title slide.) You might want to change the starting number back to 1 when you print handouts, notes, or outlines, though.

Note: There are other options here that might interest you, such as those under Slides sized for. If you're printing your slides, these choices come in handy.

Wednesday, September 21, 2005

Betcha didn't know about whiteboards and blackboards in PowerPoint


How cool is this?

Ok, say you have a very neato presentation you are about to give to a live group somewhere and you have the file in Slide Show mode. Now click "W" on your keyboard for a white screen or "B" on your keyboard for a black screen. Right click with your mouse and choose Pointer Options and pick a pen. Right click again and choose the pen color. Go draw, write, doodle. Do your thing!

Lots of fun!

Monday, September 05, 2005

Creating Play Buttons for PowerPoint Presentations

Create the buttons

To use action buttons:


On the Slide Show menu, point to Action Buttons, and select a button. Point to the slide and click; the button is added.
In the Action Settings dialog box that opens, click None and click OK.

Apply movie actions

To apply Play, Pause, or Stop effects to a movie:


Open the Custom Animation task pane, and select the movie on the slide.
In the task pane, click Add Effect, point to Movie Actions, and select the effect you want.

Trigger the buttons To make a button the trigger for an effect:

Select the effect you want to be triggered by a button; display its menu and click Timing.
Under Triggers, click Start effect on click of, and select the action button that you want to be the trigger for the effect.

Sunday, August 28, 2005

Package a presentation to a CD or folder

To bundle files to a CD or folder:

1. Open the presentation you want to package.
2. On the File menu, click Package for CD.
3. Add files you want and select and clear any options for the package.
4. Click either Copy to folder or Copy to CD.

Good uses for copying to a folder:

Makes the presentation portable so that it can be shared on a file server.

Enables you to burn to a CD if you have Windows 2000 instead of Windows XP or later.

You can package your files to a folder and burn the folder to a CD using a third-party CD-burning program.

Lets you check the size of your packaged files before you begin burning to the CD.

After copying to a folder, you’d check its properties (right-click the folder, click Properties, General tab) to see the disk space used.

Thursday, August 18, 2005

Animate a chart

In normal view, display the slide that has the chart you want to animate.

To add a special visual or sound effect to text or an object.
For example, you can have your text bullet points fly in from the left, one word at a time, or hear the sound of applause when a picture is uncovered.) and select it.
On the Slide Show menu, click Custom Animation.

In the Custom Animation task pane (task pane: A window within an Office application that provides commonly used commands. Its location and small size allow you to use these commands while still working on your files.), click the down arrow on , and do one of the following:

Animate the chart as a whole

If you want to make the text or object enter the slide show presentation with an effect, point to Entrance and then click an effect.

If you want to add an effect to text or an object that is on the slide, point to Emphasis and then click an effect.

If you want to add an effect to text or an object that makes it leave the slide at some point, point to Exit and then click an effect.

If you want to add an effect that makes an object move in a specified pattern, point to Motion Paths and then click an effect.


Items are listed in the order in which they are added, and include icons that indicate timing in relation to other animation events.), top to bottom, in the order you apply them. If you add chart effect options, they will appear in a collapsed list under the effect that you applied to the chart. The animated items are noted on the slide by a non-printing numbered tag that correlates to the effects in the list. This tag does not show up in the slide show view.

Thursday, August 11, 2005

Extract sound files from PowerPoint

Want to extract narration from a PowerPoint file to tweak in a third-party sound-editing program? You can extract audio files from narrated presentations by saving them in the .html format.

Open your narrated PowerPoint and Choose File>Save as Web Page. Be sure to choose Web Page (.html) from the "Save as Type" drop-down list (not Single File Web Page).

After saving, click Web Options and click Publish. Look through the .htm or .html files that PowerPoint created and you'll see a .wav file for each slide, numbered consecutively.

They'll look something like this: sound001.wav or sound002.wav.

(Tip provided by Presentations columnist, Ellen Finkelstein, www.ellenfinkelstein.com)

Monday, August 08, 2005

Making charts dim or disappear to focus audience attention in PowerPoint

The final panel in the Chart Effects property sheet, After Animation, lets you hide or dim the entire chart after you've revealed it through animation.

You can even place two charts on the same slide and use one of the hide settings to make the first chart disappear before you display the second. This lets you concentrate the focus of your presentation even more minutely as you step through it.

To make your first chart disappear before you reveal a second chart on the same slide, select the first chart and then choose Slide Show | Custom Animation from the menu bar and click on the Chart Effects tab.

On the Entry Animation And Sound panel choose an effect to make your first chart appear during the presentation. Then on the After Animation panel, select Hide After Animation (or Hide On Next Mouse Click) or choose a light shade of a color to dim the chart and click OK.

Finally, repeat the process for your second chart. Now when you play the slide show only one chart will be visible at one time even though they are both located on the same slide.

Monday, August 01, 2005

How to use the new diagramming function in PowerPoint 2003


The flash video tutorial is here.

Take a look at the new diagramming functionality in PowerPoint 2003. These 5 types are available:

Venn (Venn diagram: A diagram that is used to show areas of overlap between and among elements.)

Cycle (Cycle diagram: A diagram that is used to show a process that has a continuous cycle.)

Pyramid (Pyramid diagram: A diagram that is used to show foundation-based relationships.)

Target (Target diagram: A diagram that is used to show steps toward a goal.)

Radial (Radial diagram: A diagram that is used to show relationships of elements to a core element.)

Monday, July 18, 2005

How to add Flash to Your PowerPoint Slides

Now here's one I get asked all the time.... you can find free Flash embedded slides here at the Brainy Betty site here as well as Flash and Swish samples and downloads here, but most people want to know how to do this themselves.

It's pretty easy - but requires a visual walkthrough - so go take a look here.

You can always find all kinds of other tutorials and demos on the site any time. Happy Monday!

Thursday, July 07, 2005

How to Record Your Own Sound Effects or Music for Presentations


If you don't have a WAV file on your PC, don't worry, you can record your own WAV files using your PC's sound recorder. All you need is a microphone and a sound card with a mic input.

To record a sound effect, make sure your microphone is hooked up properly and then choose Programs | Accessories | Entertainment | Sound Recorder from the Start menu to open the Sound - Sound Recorder dialog box.

Once you're ready to begin recording, click the Record button and say something into the microphone. Use your imagination and try to create your own unique sound effect. As you're recording, the green line in the center of the Sound - Sound Recorder dialog box should begin moving in a wave format. When you've finished recording, click the Stop button.

You can play back your recording by clicking the Play button. If you like the recorded sound, you can save it as a WAV file. To do this, first choose File | Save As to open the Save As dialog box. Next, choose a location for your sound and enter a name for it in the File Name text box. Finally, click Save.

Now go try it out! It's a lot of fun!

Tuesday, July 05, 2005

Reduce Your Presentation File Size


I often get questions about how to reduce the file size in PowerPoint presentations. Here's a flash demo of how you can do one thing to make files smaller, quickly and easily in PowerPoint 2003!

Everybody's Blogging Except You??

This is a great intro and review of current tools. - Betty

Starting a Blog - Yahoo! News

Monday, July 04, 2005

Creating a Panaromic Slide Show!

Using the Panoramic Effect!

Here’s an eye-catching novelty effect for your next PowerPoint presentation: the wide-screen or “letterbox” view. It seems that every time you turn around, you see another movie coming out on video in a wide-screen or “letterbox” edition, one that has those black bands running across the top and bottom of the screen. It’s easy to simulate this wide-screen effect in a PowerPoint presentation – all you have to do is change the height of the slides. Here’s how:

¨ Select Page Setup from the File menu.

¨ In the Page Setup dialog box, change the Height from the default 7.5” to 4 or 5 (play with it and see which one you like best).

¨ Click OK.

That’s all there is to it. You might want to scale down your text and graphic objects by about one third, so they’ll fit onto your slides better. And try to use pictures and clip art with a landscape, rather than a portrait orientation, because they’ll fit better. Otherwise, work with your wide-screen slides just as you would with regular ones. And expect your wide-screen presentation to turn heads whenever you show it.

Introduction

Hi Everybody,

I'm setting up this blog because Brainy Betty gets so many questions about understanding Microsoft PowerPoint that I thought it might be worthwhile to set up a blog and talk about some of the things you can do with the program.

This is Nan Shastry, blogcasting to you (hopefully via FeedBurner some time this week( and glad to meetcha. Subscribe to this feed by adding it to your RSS newsreader (Bloglines is a great free reader) and you can always learn something new each week about cool tips, tricks and useful ways to use Microsoft PowerPoint.